Rental
Choose your device info when renting
How to pick device info when renting an Android Cloud Phone: Random vs Select mode, using presets, and why every device gets its own unique hardware IDs.
4 min read
When you rent a new device, you can decide up front what device info it will carry: fingerprint, manufacturer, model, IMEI, serial number. This page explains the Spoof device info row in the rental confirmation modal: when it shows up, how Random differs from Select, and what happens after you hit rent.
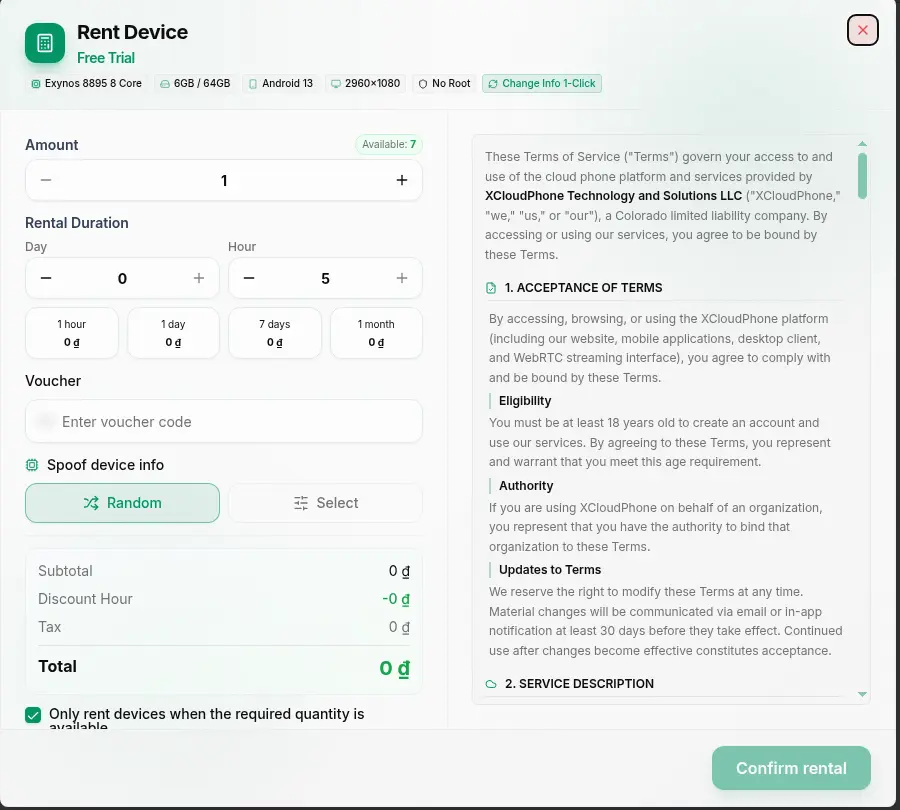
Where to find it
The Spoof device info row lives in the rental confirmation modal, right below the Voucher field. It is a single row with two buttons: Random and Select.
The row only appears when both conditions are met:
- You are renting a new device. It does not appear when you extend a device you already have.
- The package supports changing device info, meaning its card carries the Change Info Device 1-Click badge.
If your package has no such badge, the row stays hidden and the device keeps whatever info it already has. On the Rental Store page you can narrow down to these packages with the Has Change Info filter.
Random or Select?
| Random (default) | Select | |
|---|---|---|
| What the device gets | The random info set the device already has | Exactly the info set you picked |
| After renting | Nothing extra, the device is ready right away | The device restarts automatically to apply it |
| Best when | You don't care about the details | You need one specific info set |
Random is the default. Clicking Select opens the picker modal; if you hit Cancel in there, the mode stays on Random. The mode only actually switches to Select once you have confirmed an info set.
While Select is active but nothing is picked yet, the row shows the hint "Pick a specific device info to apply after renting.". Once you pick one, it changes to "Selected: {name}".
The "Choose device info" modal
The modal subtitle spells out what will happen: "Applied to your device(s) right after renting. The device restarts to apply it."
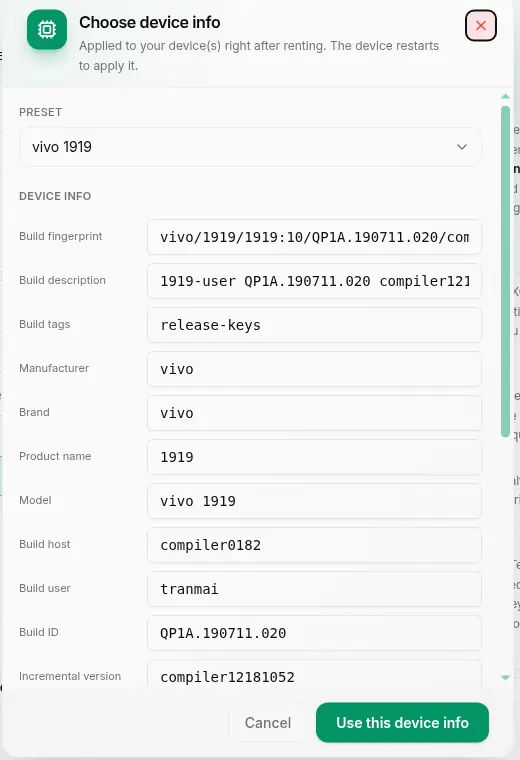
Preset
The Preset dropdown pulls its list from the server. While it loads you see "Loading presets…". If the fetch fails, the modal shows "Couldn't load presets." with a Retry button.
Picking a preset fills every field for you. If you hand-edit any field, the dropdown flips to Custom to signal that the set no longer matches the original preset.
The two field groups
The modal splits the fields into two groups:
- Device info - the build fields: Build fingerprint, Manufacturer, Brand, Model, Product name, Build ID, Build date and related entries.
- Hardware IDs - four fields: IMEI (SIM 1), IMEI (SIM 2), Serial number, Android ID.
Every field has its own Randomize button to re-roll just that value, plus Randomize all to re-roll everything at once. The confirm button is Use this device info, and it only enables once the set is complete. Cancel closes the modal without applying anything.
Renting several devices at once
This is the part worth remembering: each device gets its own set of Hardware IDs, even when they all share the same preset.
Rent 10 devices from one preset and you get 10 devices with identical build info (same manufacturer, same model) but 10 different IMEIs, serial numbers and Android IDs. No two devices end up with the same hardware IDs.
After you rent
If you went with Select, the devices you just rented are flagged as still being set up. Open one now and you will see this overlay:
Setting up your device… Applying device info. This can take a few minutes.
That is normal, not an error. The device is restarting to apply the new info. Wait for the reboot to finish and it is ready. While it runs, you may see the toast "Setting up device info…".
If applying fails
When the info cannot be applied, you get this toast:
Couldn't apply the selected device info. You can change it later from My Devices.
The rental itself still succeeded. Only the device-info step failed. Your payment and rental session are unaffected and are never rolled back.
To change it afterwards, open Sync Control, right-click the device and choose Batch Actions → Change Device. Note that this route hands the device a random info set rather than letting you pick one like at rental time, and the device reboots as well.
Extending does not offer this
The extend modal has no Spoof device info row. Extending simply buys more time on a device you already have, and the device keeps its current info. See Extend a rental for more.
If you don't care what info the device carries, leave it on Random - it is faster and skips the reboot. Reach for Select only when you genuinely need a specific info set, for example when you run several game accounts and want each one on a particular device model.